The KAPtery closed on December 31, 2024. Products can no longer be ordered from these pages. Some products are available for purchase from Ennapurna in France. For questions, replacement parts, special requests, or leftover inventory, use the Contact page above.
New 3D models make kit assembly easier
The most recent designs of KAPtery rigs have some improvements which make the finished parts easier to assemble into a working kite aerial photography rig. Previously there was a lot of careful measuring and drilling required so the camera would be balanced. The current models have most of the holes already incorporated into the 3D printed parts. This change eliminates about an hour of work for most people assembling a rig kit for the first time.
 |
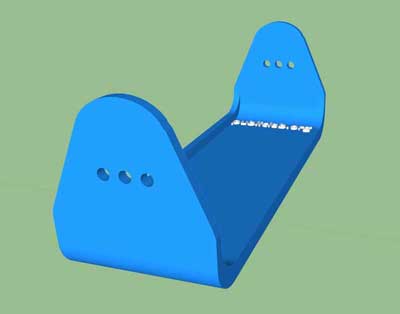
| Pre-placed holes in the upper frame and camera tray (red dashes) are for bolts to connect them. The height of the hole on the tray allows most small point & shoot cameras to be balanced when pointed straight down for capturing mapping photos. For very short or very tall cameras, a new hole can be drilled in the tray. |
This is possible because most of the cameras used on these rigs are similar in size and shape, and I eventually found hole locations that work very well for these cameras. The front-to-back balance may not be perfect, but it is easy to compensate for that by adjusting tilt angle. And if a particular camera does not work well enough with the existing holes, it is still possible to drill new holes to improve fit or balance.
There is one hole that I could not incorporate into the models. A hole always has to be drilled through the camera tray for the tripod screw which holds the camera on. The location of the tripod socket on small cameras varies a lot among models, and the hole for that quarter twenty bolt determines where the camera sits on the tray. If the camera sits to one side, the rig will hang lopsided, and the rig cannot compensate for that.
 |
| The dual camera tray for the Titan 2 Rig has three camera platforms and is therefore reversible -- the two cameras can be mounted with their bases at either side of the tray (to the right or left above). The upper frame is then attached off center to compensate for the uneven weight distribution. Holes are present in the 3D model for bolts on either side of the center tray (see arrow). Dotted red lines are the axis of rotation around the bolts that hold the tray to the upper frame. The tray should balance on that axis. If the tray does not balance, a new hole can be drilled in the tray. |
 |
|
The two wider trays (Wide and One-lip) for the Redstone Rig have three pairs of holes for bolts. Use the pair which allows the tray to balance front-to-back with the camera back mounted against the tray lip (with lens extended). This feature allows these trays to work for both small and large cameras. |
It is also important to mount the camera with its back snug against the lip along a tray edge so the camera cannot rotate. That greatly reduces the risk that the camera will move and start to loosen the bolt. It also ensures that as soon as the camera is bolted on, it is pointed in the right direction.
So there is always one important hole to drill in the camera tray of a Redstone Rig (and two holes for a Titan 2 Rig). Measuring and drilling that hole in just the right place, and making it just the right size, can take an hour the first time you do it. Drilling both holes for the Titan 2 Rig can take two hours. So I was happy to eliminate all the other measuring and drilling for these rigs.
If you are assembling one of these rigs, allow a couple of hours and read the full assembly instructions. But don’t fret. I still get the tripod bolt hole in the wrong place or make it too big about a third of the time. So each rig kit includes a piece of PLA filament, a strand of the same plastic the rigs are made from. Use a soldering iron to melt the filament and partially fill your errant tripod hole so you can adjust its size and location slightly until you get it just right. This is one of the handy features of 3D printed parts.
